LOOKING GUIDE
Look at a painting for five minutes
A short exercise turns a first impression into something you can explain.
In this guide 6 sections
Minute one: the whole picture
Stand far enough back to see the full work comfortably. Describe its largest areas before identifying the subject. Where is the lightest part? Which colour takes up the most space? Notice whether your attention moves in a loop, across a diagonal or towards one point.
Minute two: the surface
Move closer while respecting the gallery’s boundaries. Look at marks, layers and edges. Some areas may show the material beneath; others may be smooth or thick. Describe what is actually visible rather than assuming how it was made. Ask the gallery if the process matters to your reading.
Minute three: the structure
Look for repeated lines, shapes or colours. Ask how the picture would change if one detail were removed. This is a thought experiment, not a request to handle the work. A quiet margin can be as important as a figure in the centre.
Minute four: the label
Read the artist, title, date and medium. Separate the date of the artwork from the exhibition date. A title may direct attention, introduce a story or deliberately leave it open. Compare this context with what you noticed before reading it.
Minute five: one supported interpretation
Complete this sentence: “I read the work as ___ because I can see ___.” For example, a room might feel unsettled because its doorway is tilted and its darkest area is near the edge. You have connected an interpretation with evidence. Another visitor may notice something different.
Keep a compact note
Record the artist, title, venue and one visual observation. If photography is permitted, include a label in a separate image for reference, without photographing visitors unnecessarily. Your note should still make sense when you no longer have the artwork in front of you.
From the whole painting to one mark
- 01Step back
Notice the arrangement and where your eye goes first.
- 02Move closer
Without touching, inspect edges, marks and surface changes.
- 03Compare
Read the label, then check what its context changes for you.
Read an artist statement after writing your own observation
An artist statement can offer context without replacing a look at the work. Try the exercise with your own drawing and a short statement you write for it. No invented statement below is attributed to a real artist. In a gallery, keep the work and its actual label identifiable and respect viewing and photography rules.
- Before reading, write one concrete observation: the location of a shape, a repeated edge or a visible change in colour. Avoid guessing a technique or a person's emotional state.
- Read the statement and record who wrote it, which work or series it concerns and its date. A gallery introduction, artist's words and later critical interpretation are different sources.
- Pick one claim to revisit. Point to the part of the image that supports, complicates or does not answer it. A statement about intention need not be visually provable.
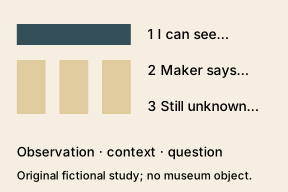
- Finish with three separate lines: observation; source-attributed context; unresolved question. Keep your first note so you can see what the context changed.
Completed fictional example
For the original study below, the first note is “Three pale rectangles sit below a darker band.” The invented maker's note says “I arranged the forms around a memory of waiting.” A defensible response is: I can see the three forms and band; the maker connects the arrangement to waiting; I cannot establish a particular place or event from this image. The note helps frame a question without creating a biography.
Copyable record: work/title/artist from source ___; first visible detail ___; statement author/date/scope ___; one claim ___; detail revisited ___; interpretation ___; unresolved question ___. The National Gallery of Art's line resource provides examples of looking at formal features; the three-line worksheet and study here are our own. No current exhibition or venue availability is implied.
Three comparisons for a line on paper
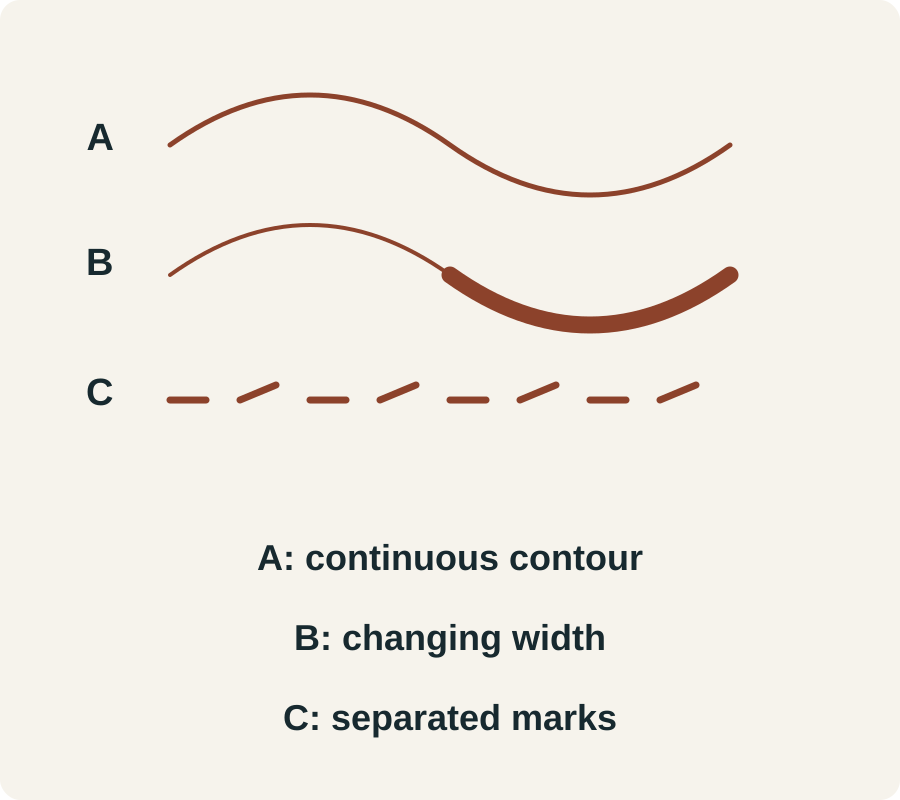
Try this with your own drawing or a rights-cleared digital image of a work on paper. The diagram is a new line study, not a reproduction of a museum object. At a gallery, respect viewing barriers and ask before photographing.
- Edge: follow one continuous contour. Where is it sharp, broken or difficult to distinguish from the background? Describe its appearance before naming a tool or technique.
- Weight: compare two stretches of the same line. Does one look wider or darker? A photograph’s lighting and compression may affect what you see; darkness alone does not prove pressure.
- Spacing: compare a dense group of marks with an open area. Describe their relative gaps rather than assuming the artist’s mood or intention.
Completed note for the original study below: line A has an even contour; B alternates narrow and broad segments; C uses separate short marks with visible gaps. “B was drawn angrily” is an interpretation unsupported by this diagram. “C leaves gaps that A does not” is an observable comparison.
Now compare two details in the same real work. Keep the image scale and viewing conditions as similar as possible. Record title/artist from the source, detail locations, visible difference, possible image limitation and a question for the label or catalogue. A medium attribution belongs to that record; do not infer pencil, ink or a particular print process merely from a small online image. Finish with one supported sentence and one unresolved question. This exercise makes no claim about a current exhibition or opening time.
Source: www.nga.gov.